How to Remove Silence from an Audio using Python

There are many ways available that remove the silence part or the dead spaces from an audio file but it’s time consuming to know which one is work best for you. Here in this article I’ll walk you through few commonly used techniques to remove the silence and its pro’s and con’s
Though there are tools that only detects the silence and does not remove it from the audios implicitly. We can consider that also and use that information to remove the silence explicitly. Before we start lets understand few terminology that we are going to use later 1.Silence Time Threshold : Time duration for which there is no sound intensity (SI) or it is very low that can be consider as silence, most of the times it is fixed. For example if you keep Silence Time Threshold as 10 sec then your algorithm should detect dead/silence spaces greater than or equal to 10 sec. 2. Sound Intensity Threshold : Like time threshold, it is the threshold for sound intensity. For example if intensity threshold is 45db then the intensities those are less than 45db are considered as silent. We can keep it fixed throughout the audio or can make it dynamic based on the requirement. Lets begin …
If your audio file size is small and time threshold is low i.e below 2 sec then pydub would be a preferable solution. Pydub method “split on silence” returns list of audio part with removed silence. In pydub we get the flexibility to keep desirable silent time, for example if we want to remove silence 10 sec and replace it with 2 sec silence then can we pass these arguments in pydub method
python code for removing silence from an audio using pydub. For complete code please use git repo
# Import required libraries
from pydub.silence import split_on_silence
from pydub import AudioSegment, effects
from scipy.io.wavfile import read, write# Pass audio path
path ='/audio_path'
rate, audio = read(path)# make the audio in pydub audio segment format
aud = AudioSegment(audio.tobytes(),frame_rate = rate,
                     sample_width = audio.dtype.itemsize,channels = 1)# use split on sience method to split the audio based on the silence,
# here we can pass the min_silence_len as silent length threshold in ms and intensity thershold
audio_chunks = split_on_silence(
    aud,
    min_silence_len = 2000,
    silence_thresh = -45,
    keep_silence = 500,)#audio chunks are combined here
audio_processed = sum(audio_chunks)
audio_processed = np.array(audio_processed.get_array_of_samples())#Note the processed audio rate is not the same - it would be 1K
pros : It is easy to implement, very less post-processing task as ‘split_on_silence’ take care of everything.
Cons : If you want to remove silence more than 5 or 10 sec i.e Silence Time Threshold =5 or 10. It takes great amount of time. Also if the size of the audio is large it takes time to process.
Note : We can also use “detect_silence” method of pydub and then remove silence
This library is mainly developed to extract features from the audio file using machine learning techniques. In one of its feature it highlights the non-silent regions in audio, so we can use this information to find the silent part and remove it. Unlike pydub, we don’t need to fix the sound intensity threshold to define the silence, instead it calculates the threshold value dynamically. It follows semi-supervised approach — it uses SVM to distinguish between high energy and low energy band of the audio (As sound energy is proportional to sound intensity, we can model it based on the sound energy). The trained SVM then produces the probability regions based on its energy level and then we can differentiate low probability region as the silent part in audio file.
Example of silence removal using pyaudioanalysis, below code returns the active/non-silent part
#import required libraries
from pyAudioAnalysis import audioBasicIO as aIO
from pyAudioAnalysis import audioSegmentation as aS# path to audio file
path='/audio_path'# below method returns the active / non silent segments of the audio file
[Fs, x] = aIO.read_audio_file(path)
segments = aS.silence_removal(x,
                             Fs,
                             0.020,
                             0.020,
                             smooth_window=1.0,
                             weight=0.3,
                             plot=True)
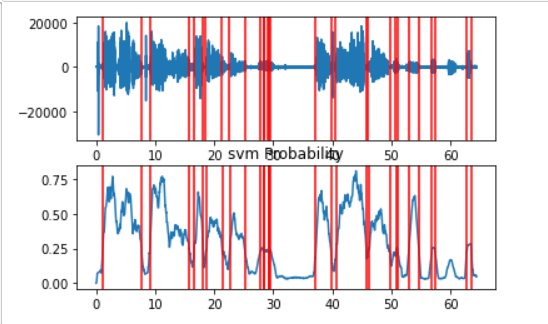
This pyaudioanalysis requires a bit of postprocessing to convert the above non-silent parts to silent part. I’ve written below code that takes non-silent sengment and silent time threshold as input and returns the silent region
import librosadef update_segments(filename,segments, sil_time):
    '''
    filename= audio file path
    segments= Active segment output from pyaudoanalysis
    sil_time = Silence time/ Time threshold above which silence to be consideredreturns:
    list of start and end of silent time frames
    '''
    ans=[]
    tmp=0
    n=len(segments)
    for  idx,t in enumerate(segments):
        if t[0]-tmp>=sil_time:
            ans.append((tmp,t[0]))
        tmp=t[1]
        if idx==n-1:
            fn=librosa.get_duration(filename=filename)
            if fn-tmp>=sil_time:
                ans.append((tmp,fn))
    return ans
After we process the output using above function then the silent region detected by pyaudioanalysis is shown below. Code to plot the wavform can be get from git repo
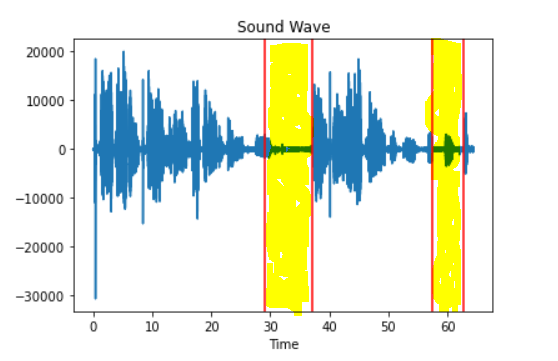
Pros: It is faster than pydub, detects the silence based on dynamic threshold selection.
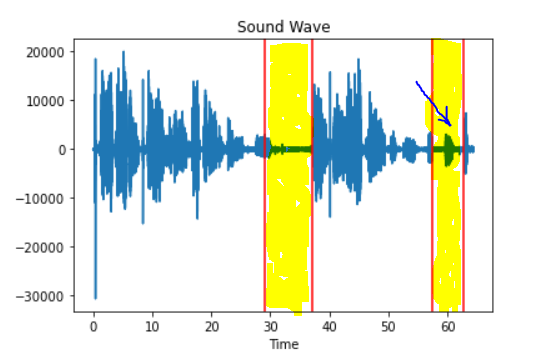
Cons: Need to process the output from pyaudioanalysis to get the desired output. Sometimes it marks a very low non-silent mark as silent portion as shown below
3. FFMPEG
FFMPEG is an open source project started in 2000 using c language and assembly language. It is used to manipulate videos, audios and other multimedia files, we’ll restrict ourselves to its use in removing silence. At its core it is command line ffmpeg tool, designed to process video and audio files using command line. Since it is written in c and a command line tool, we can’t use it in a python directly. There are two ways, by which we can use it in a python : 1. Use a python wrapper available such as ‘ffmpeg-python’ or 2. Run the ffmpeg commands through python and process its output as per the requirement. We’ll use the second method to remove the silence.
In ffmpeg, there are two methods 1. Silence Detect 2. Silence Remove. As the name suggests one is to detect the silence part and other directly removes the silence. I personally prefer Silence detect method to remove the silence, as silence remove method removes all the silence. For example if there is silence/dead space of 10 sec and want to make it 2 sec silence then ffmpeg’s silence remove doesn’t allow to give an option to keep 2 sec silence, it will remove all 10 sec dead space. In most of the cases it is not desirable, as there should be some silence in the audio to understand it clearly. Silence detect methed give us the time frames where the dead space is present, we can use it to remove the silence.
# Silence detect
ffmpeg -i silence.mp3 -af silencedetect=n=-50dB:d=5 -f null -# This will detect silence having noise threshold less than 50db and # silent duration of 5 sec# Silence Remove
ffmpeg -i silence.mp3 -af silenceremove=stop_periods=-1:stop_duration=1:stop_threshold=-90dB -f null -
To run this command in python and to get the desired output out of it, I wrote below function.
# function to use ffmpeg in python and get the detected silence.def detect_silence(path,time):
    '''
    This function is a python wrapper to run the ffmpeg command in python and extranct the desired output

    path= Audio file path
    time = silence time threshold

    returns = list of tuples with start and end point of silences

    '''
    command="ffmpeg -i "+path+" -af silencedetect=n=-23dB:d="+str(time)+" -f null -"
    out = subprocess.Popen(command, stdout=subprocess.PIPE, stderr=subprocess.STDOUT)
    stdout, stderr = out.communicate()
    s=stdout.decode("utf-8")
    k=s.split('[silencedetect @')
    if len(k)==1:
        #print(stderr)
        return None

    start,end=[],[]
    for i in range(1,len(k)):
        x=k[i].split(']')[1]
        if i%2==0:
            x=x.split('|')[0]
            x=x.split(':')[1].strip()
            end.append(float(x))
        else:
            x=x.split(':')[1]
            x=x.split('size')[0]
            x=x.replace('\r','')
            x=x.replace('\n','').strip()
            start.append(float(x))
    return list(zip(start,end))
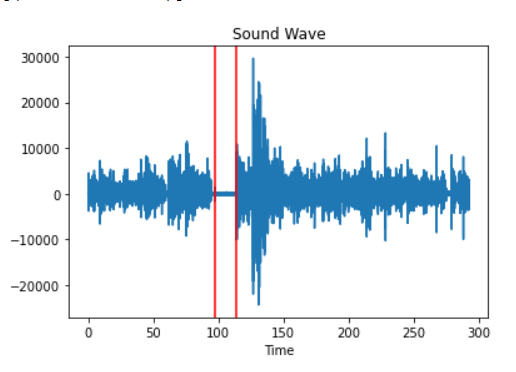
It detected the silent region as shown below:

Pros: Its very fast, irrespective of time threshold and audio size.
Cons: It is a command line tool, need to write additional code to get the desirable output.
4. Remove Silence from silent detect:
As discussed earlier that we can use silence detect information to remove the silence. Below python code removes the silence part knowing the silent intervals
from scipy.io.wavfile import read, writedef remove_silence(file,sil,keep_sil,out_path):
    '''
    This function removes silence from the audio.

    Input:
    file = Input audio file path
    sil = List of silence time slots that needs to be removed
    keep_sil = Time to keep as allowed silence after removing silence
    out_path = Output path of audio file

    returns:
    Non - silent patches and save the new audio in out path
    '''
    rate,aud=read(path)
    a=float(keep_sil)/2
    sil_updated=[(i[0]+a,i[1]-a) for i in sil]

    # convert the silence patch to non-sil patches
    non_sil=[]
    tmp=0
    ed=len(aud)/rate
    for i in range(len(sil_updated)):
        non_sil.append((tmp,sil_updated[i][0]))
        tmp=sil_updated[i][1]
    if sil_updated[-1][1]+a/2<ed:
        non_sil.append((sil_updated[-1][1],ed))
    if non_sil[0][0]==non_sil[0][1]:
        del non_sil[0]

    # cut the audio
    print('slicing starte')
    ans=[]
    ad=list(aud)
    for i in tqdm.tqdm(non_sil):
        ans=ans+ad[int(i[0]*rate):int(i[1]*rate)]
    #nm=path.split('/')[-1]
    write(out_path,rate,np.array(ans))
    return non_sil
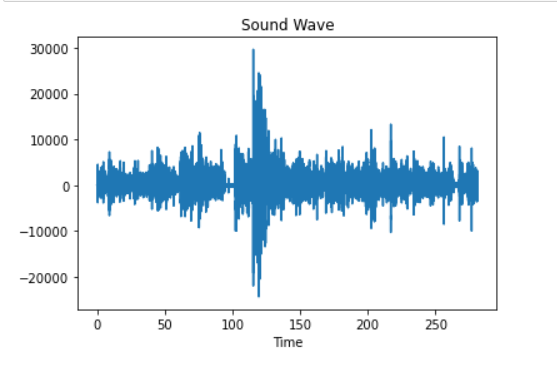
Waveform before and after silence removal shown below:
Conclusion
There are various tools available to remove the audio also we saw how we can use silence detect information to actually removing silence part. If you want to remove silence from audio with very short time threshold then pydub is good option as its simple and straight forward. If its ok to ignore very low and noisy audio then pyaudioanalysis is the good option. As it has speed and simple to implement. Now if you want to use it in large scale and don’t want to loose any non-silent part then FFMPEG is obvious option.
Hope you got the brief idea about tools used in audio analysis. link to git repo -
